
See topics forSitecore CMS
Creating an Article
There are two templates located path Sandbox/ _templates.
- Announcement Article Template COPY to News folder
For creating an: Announcement, Advisory, Alert, and News article.
- News Article Redirect COPY to News folder
For creating: a News Articles that redirects to Uconn Today.
Workspace Set-Up
- Log in
- Launchpad>Content Manager
- From the Content Tree–Open Content>uch-intranet>home>News Search>News*
- From the Content Tree–Open Media Library>Sites>uch-intranet>Images>News and Community>News*
*Add both locations to Navigation>Favorites add to favorites
News Article Content
You can either copy directly from the web page or copy these areas into a text file. Have the following information available when creating your Announcement or News Article Redirect.
- Full URL (For Redirects)
- Page Title
- Author name, include Title
- Teaser or Description
- Banner Image 1200 x 400px, story Images 1000px or less
Copy the Template to the News Folder
To start creating an Announcement or News Article Redirect the template has to be copied into the related date news folder.
- Open: Content>uch-intranet>home>Sandbox>_Template
- Choose either template:
Announcement Article Template COPY to News folder
News Article Redirect COPY to News folder - Copy the template file to the News/2024/Month for the Announcement or Article
- Right-click the template and rename the file (this will be the page URL)
Content Details
Updated the following areas in the Content details sections. Only the areas specified below need to be filled in.
Metadata and OpenGraph

Page Metadata - enter the Page Title

OpenGraph - enter the Page Title
Only fill out the title section, the other areas are for search options that are over ridden by our search set up.
Banner
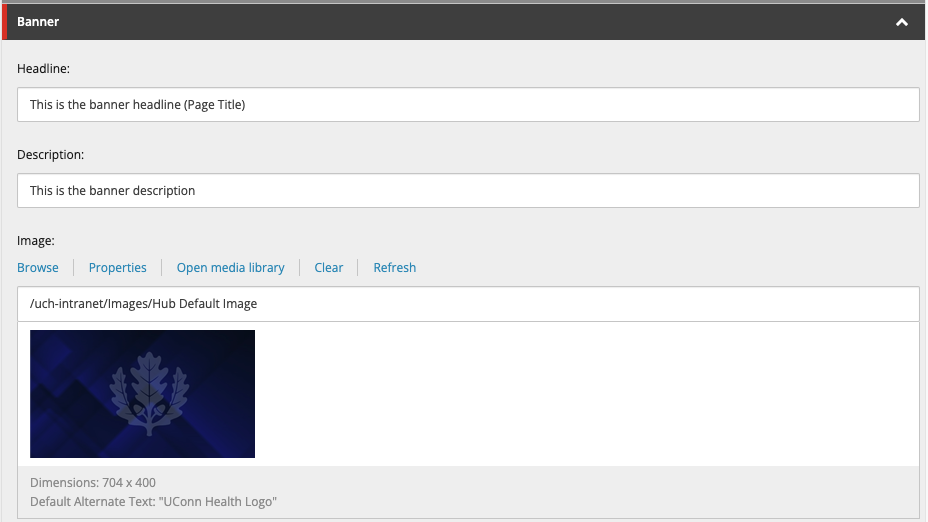
Headline: enter the Page Title (up to 60 characters)
Description: Enter teaser (up to 75 characters)
- The template default image is UConn Alert Banner
- Image size is 1200 x 400px
If selecting an image:
- Browse opens the select Media window
- Choose My Images from the left link list or search by name
- Select and upload the Image
Data

TopicTag: choose from the dropdown options
- Academic
- Advisory
- Clinical
- Community
- In Memoriam
- Institutional
- Research
AuthgorName: enter name and title
Date: Choose Today or select a date from the calendar displayArticle Body Content

Show Editor will open the Rich Text Editor
Follow the directions for cutting and pasting or for creating a new Article, Announcement, Advisory, or Alert.
- Manually paste your story in this area
- Reselect the text, use the Format Stripper tool (Strip CSS Formatting)(Strip San Elements)
- Insert any body copy images, place at the start of paragraph section
- (Check page links) If you are copying from an email, you must break and relink all on-page links
- Apply CSS Styles to: (Align and or Caption Images) or (add a Quote Block)
- Accept and Save
- Publish Item
When pasting your copy, please highlight this sentence and everything above and replace it with your content.
For Articles that redirect to UConn Today, the Article Body Content section is left blank.
Redirect

Redirect–select Insert external link
Link description: UConn Today
URL: enter the full URL
Target window: Set to new Browser
Work Tips
Images
Naming
Use key or descriptive words separated by dashes, include the image size.
dental-residents-2024-Zalvarez-mora-osleida-1200x500.jpg
Image Size
- Article Banner image size 1200px x 400px
- On-Page Full-width Images 1000px
- Caption left or right Images width 800px or Less
Compress Images
Compressing images reduces the file size to decrease page load time.
After your images have been sized use Tiny PNG to compress images.
This is a drag and drop web application that reduces the file size and then you download them back to your computer.
Uploading
From the Content Tree, select the Images folder for the related date News stories.
Media Library>sites>uch-intranet>Images>News and Community>News- Upload File (One Image)
Upload Files (advanced) for Multiple files - Enter Alt-Text for each Image uploaded
- Accept and Save
Creating an Announcement
Build your announcment following the steps in creating an Article.
The second part of creating an announcement is connecting it to the home page. This is done by adding an Announcement Item, to the Announcement section of the home page's Page Data.
Announcement Item
- Open: Content>uch-intranet>home>Page Data>Announcements
- Right-click to create a new Announcement Item
- Use the Announcement Title
- Eliminate special characters
Content Detail Sections
Data
Headline: enter the Page Title (up to 60 characters)
Description: Enter teaser (up to 75 characters)
Tags: Advisory
End Date - This field refers to End Date:Select: Date/Time
LinkCta:
Insert link or Insert external link (If linking to UConn Today)
PublishingDate - This date will appear in the announcement item(Dont clear this field):
Select: Now or Set Date/Time
- Save
- Publish
- Your article link will appear on the Home page in the News & Announcement section.
News Article Redirect
For creating a New Article Redirect, fill out out the following areas in the Content Detail sections.
Page Metadata–Page Title
OpenGraph–Page Title
Redirect–select Insert external link
Link description: UConn Today
URL: enter the full URL
Target window:Set to new BrowserData
TopicTag: choose from the dropdown options
- Academic
- Advisory
- Clinical
- Community
- In Memoriam
- Institutional
- Research
AuthgorName: enter name and title
Date: Choose Today or select the date from the calendar displayBanner
Headline: enter the Page Title (up to 60 characters)
Description: Enter teaser (up to 75 characters)
Image (1200px x 400px):- Browse opens the select Media window
- Choose My Images from the left link list
- Select the uploaded Image
- When the Image appears in Content Details, save the page
Publishing

- Save the web page
- Select the Publish Tab from the Main Menu
- Choose Publish>Publish Item (Do not select Publish Site)
- The System sends a second Message to Confirm Publish
